Chicken and Dumplings

Chicken and Dumplings


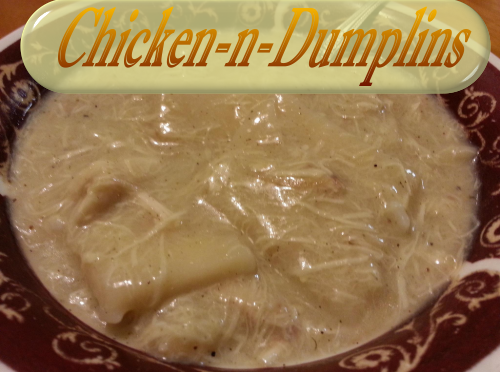
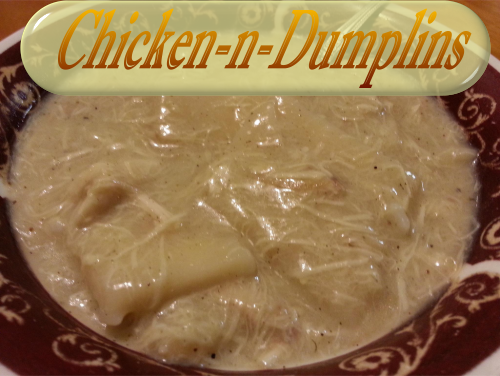
Chicken and Dumplings is my most requested meal from my kids.  It takes some work to make this recipe, but it is absolutely worth it.  There are shortcuts you can take to speed it up a bit but the results won’t be the same.  You get out of something what you put into it.  So take your time some Sunday afternoon to make this old classic recipe: Chicken and Dumplings.

To make this recipe, you will need a big pot, large enough to fit a whole chicken.  You will also need a rolling pin to roll out the dumplings.  To mix and knead the dumpling dough, I use my Kitchen-Aid stand mixer and a dough hook.  If you don’t have a stand mixer with a dough hook, you are going to have a bit more manual labor involved.  Get a Kitchen-Aid stand mixer, you will thank me a million times over, trust me.  They are an awesome tool and I LOVE mine!

KitchenAid Artisan® 5QT Mixer KSM150PS-Blue Willow Blue Willow

Ingredients for Chicken & Dumplings:

A Chicken – Giblets removed and thrown away
water
2 tsp. poultry seasoning
2 tsp. sage
1 bay leaf
salt & pepper
32 oz. carton of chicken broth
all purpose flour

Farberware Classic Stainless Steel 8-qt. StockpotPlace the chicken* into a large stock pot.  (Mine is just like this one.)  Add enough water to cover the chicken.  Add the bay leaf, 1 teaspoon of poultry seasoning, 1 teaspoon sage, 1 teaspoon salt and 1/2 teaspoon pepper to the water.  Bring to a boil, reduce heat and simmer until the chicken is cooked and is falling apart.  Remove the chicken to a bowl and allow to cool enough that you can handle it.

*If you don’t want to use a whole chicken, you could substitute boneless chicken breasts or thighs.  Your broth won’t be as flavorful so you would want to add some chicken bouillon or stock base and use less salt.

While the chicken cools, make the dumplings.

Put 2 cups of flour in the bowl of your stand mixer.  Add 1 cup chicken broth to the bowl.  With the dough hook attachment, stir until the flour and broth form a ball.  Add additional flour if your dough is too sticky.  You want it to form a ball and it will pull itself off the sides of the bowl.  Pick up the dumpling dough ball and sprinkle a light dusting of flour over the entire surface.

Clean a 2 foot area of your kitchen counter where you will roll out your dumplings.  (I’m a germophobe so I usually use Clorox wipes and wipe the counters with a clean wet wash cloth and dry thoroughly.)

Dust the counter with some flour and also dust your rolling pin and use your hand to spread the flour over the entire rolling pin surface.  Roll out the dumpling dough into a rectangular shape to a thickness of approximately 1/4″.

Using a pizza cutter, cut the dough into 1 1/2″ strips and cut again crosswise to make squares.  Dust lightly with more flour.  (This helps to thicken the broth.)

Once the chicken is a safe temperature to handle, remove the chicken meat from the bones.  Remove any icky parts like veins, gristle, etc.  Cut the chicken meat into bite sized chunks.

Strain the broth through a strainer and clean the stock pot out to get rid of the bathtub-like ring from boiling the chicken.  Return the broth and the chicken to the pot.  Add the carton of chicken broth and remaining seasonings and taste the broth, adding more salt & pepper if needed.  Bring to a boil.

Add the dumplings a few at a time to the boiling broth, stirring so that they don’t get clumped together.  Cover the pot and simmer for 15 minutes or until the dumplings are cooked all the way through.  To test this, cut a dumpling in half and see if it looks rubbery inside.  If it’s white all the way through, it’s done.

If you want your soup to be thicker, you can whisk together 1/4 cup flour and 1/2 cup of half & half or milk, making sure you get all the lumps out.  Add this to the chicken & dumplings and stir until the soup is thickened.  Another option is to add a couple cans of cream of chicken soup or my homemade cream of chicken soup mix.

Ladle into soup bowls and prepare to be complimented.  🙂

I know you will enjoy this Chicken & Dumplings recipe.  Trust me that it is worth every bit of work that goes into making it.

Pin it!  http://www.pinterest.com/pin/280278776783980358/

If you like my recipes, be a sweetie pie and share on Facebook,
Like my page “I Love To Cook” and Pin these yummy recipes on Pinterest.  🙂

Sharon Springfield

Sharon Springfield  

Sharon Springfield on PinterestSharon Springfield on FacebookFollow Me On Google+

http://sharonspringfield.com/images/cooking-blog-logo.jpghttp://sharonspringfield.com/wp-content/uploads/2013/07/youtube-150x150.jpg


Powered by Wordpress Plugins - Get the full version!

Chicken and Dumplings Recipe


Banana Split Pie

Banana Split Pie

This delicious Banana Split Pie is not shaped like a pie, but it’s not a cake either.  It’s 9 by 13 inches of creamy, fruity goodness that you may test your self control.  Yes, it’s that good!  This cool dessert is great for a summertime buffet or family party.

Banana Split Pie:

2 cups graham cracker crumbs
1 stick of butter, melted
1 (8 oz.) package cream cheese, softened
1 can sweetened condensed milk
1 large can crushed pineapple
4 bananas, sliced
1 large carton Cool Whip
chopped nuts
Maraschino cherries
cocoa powder (optional)

Mix butter and graham cracker crumbs and press into the bottom of a 9×13″ baking dish.  Thoroughly mix together the softened cream cheese and sweetened condensed milk.  Spread over the graham cracker crust, followed by the pineapple and bananas.  Spread with Cool Whip and top with nuts and cherries.  Dust with cocoa powder (optional).  Cover with plastic wrap and refrigerate until thoroughly chilled before serving.

Like this?  Pin it!  Here’s the link: http://www.pinterest.com/pin/280278776783975614/

If you like my recipes, be a sweetie pie and share on Facebook,
Like my page “I Love To Cook” and Pin these yummy recipes on Pinterest.  🙂

Sharon Springfield

Sharon Springfield  

Sharon Springfield on PinterestSharon Springfield on FacebookFollow Me On Google+

http://sharonspringfield.com/images/cooking-blog-logo.jpghttp://sharonspringfield.com/wp-content/uploads/2013/07/youtube-150x150.jpg


Powered by Wordpress Plugins - Get the full version!

 Banana Split Pie

Marinated Grilled Veggies

Grilled Veggies


Marinated Grilled Veggies are so easy to prepare and they make a great side dish.  You can cut up your veggies up to a day ahead and let them marinate until you are ready to fire up the grill.  We have a grill basket that we use to make these grilled veggies.

Ingredients:

2 zucchini squash
2 yellow squash
1 sweet onion
1 red bell pepper
1 package fresh mushrooms

Wash, rinse and dry the veggies.  (I always use antibacterial soap and rinse well to remove any pesticides or other cooties.)  Rinse the mushrooms in just water, removing all the dirt, and set on a towel to dry.  Cut off the stems.

Prepare the marinade:

In a large ziplock bag, add 3 Tablespoons olive oil, 2 Tablespoons balsamic vinegar, 1 teaspoon minced garlic, 1 teaspoon oregano, a dash of seasoned salt such as Everglades seasoning or Adobo seasoning.  If you want to go the easy route, just use a balsamic vinagrette dressing, approx 1/4 cup.

Chop all the veggies up in bite sized pieces and add to the ziploc bag with the marinade.  Seal the bag and toss the marinade over all the chopped veggies.  If you are going to be cooking it right away, you can just leave it out on the counter while your grill heats.  If you aren’t cooking them immediately, refrigerate until you are ready to cook.

Marinated Veggies

Pre-heat your grill and the grill basket.  Add  approximately half of the marinated veggies to the basket.  Stir to evenly distribute them in the basket.  Close the grill lid and let them sizzzzzle away for a few minutes.  Stir every couple minutes.  When they are crisp-tender, they are done.  Scoop them out of the basket into a serving bowl.  Repeat with remaining marinated vegetables.

Serve as a side dish or make into a vegetarian dinner in a whole wheat wrap or on a bun.

We had ours with grilled fish and rice pilaf.

Blackened Grilled Fish on Rice Pilaf with Marinated Grilled Veggies


Marinated Grilled Veggies are SOOO GOOD that I would eat them every single day!  Give this a try, you will love it!

Pin it on Pinterest!  Here’s the link: http://www.pinterest.com/pin/280278776783968285/

If you like my recipes, be a sweetie pie and share on Facebook,
Like my page “I Love To Cook” and Pin these yummy recipes on Pinterest.  🙂

Sharon Springfield

Sharon Springfield  

Sharon Springfield on PinterestSharon Springfield on FacebookFollow Me On Google+

http://sharonspringfield.com/images/cooking-blog-logo.jpghttp://sharonspringfield.com/wp-content/uploads/2013/07/youtube-150x150.jpg


Powered by Wordpress Plugins - Get the full version!

Marinated Grilled Veggies

Cabbage Rolls

Cabbage Rolls


Cabbage Rolls Recipe

This recipe for cabbage rolls is from my mother-in-law.  When I married her son, I asked her to share with me some of his favorite recipes so that I could “make it like Mom made it”.  My hubby always appreciates it when I take the time to make his mom’s Cabbage Rolls, which always makes me happy too!  I hope you enjoy the recipe. 🙂


Cabbage Roll Filling Ingredients:

1 pound ground chuck
1 cup cooked rice
1 egg, beaten
1/3 cup Worcestershire sauce
1 small onion, chopped
1 red bell pepper, chopped
dash of salt & pepper
dash of garlic powder
dash of cayenne pepper
Steamed cabbage leaves

Cabbage Rolls Sauce Ingredients:

2 cups tomato sauce
1 tablespoon apple cider vinegar
1 tablespoon sugar
dash of garlic

Mix uncooked meat, cooked rice, onion, peppers and seasonings in a large bowl.  Place some meat mixture in the middle of a cabbage leaf and roll up.  (like you’d roll up a burrito)

Place the cabbage rolls in a 9×13″ glass baking dish or cast iron bakeware.  Pour sauce over the top.  Cover baking dish with foil.  Bake in a 350º F oven for 40 minutes or until the meat is cooked through.

Cabbage Rolls Recipe

Pin it!  Here’s the link: http://www.pinterest.com/pin/280278776783963074/

 Sharon Springfield

Sharon Springfield

 Sharon Springfield on Facebookhttp://sharonspringfield.com/wp-content/uploads/2013/07/youtube-150x150.jpgSharon Springfield on Pinteresthttp://sharonspringfield.com/images/cooking-blog-logo.jpg

The Best Pineapple Upside Down Cake

image001


Not to brag, but I make the best pineapple upside down cake. This cake is smothered in buttery, sticky sweet pineapple and cherries.  It’s irresistible and a hit at every potluck or family gathering.  I’m going to teach you how you can make one too.

 The Best Pineapple Upside Down Cake Ingredients:

  • butter
  • brown sugar
  • 2 cans of pineapple slices
  • A jar of maraschino cherries
  • Yellow cake mix

The Best Pineapple Upside Down Cake Instructions:

To be authentic, you need to bake this in a cast iron skillet.  This is how I learned from my Mom, an old fashioned southern cook.  A 12 inch skillet does the trick. You could also use two round cake pans for one cake mix.  Heat pan(s) it in the oven and melt 3 tablespoons of butter in the skillet.  Remove from the oven and sprinkle brown sugar in an even layer over the butter.  Drain the pineapple juice, reserving it to use later in the batter.  Arrange pineapple rings in the bottom of your skillet, over the brown sugar – butter layer.  Place a cherry in the middle of each pineapple ring and in the spaces between the rings.  Set aside.

At this point you could either use a cake mix or whip up some homemade cake batter.  Replace the liquids called for in the recipe with the reserved pineapple juice.  Pour cake batter into pans and bake for 25 to 30 minutes or until toothpick inserted in middle comes out clean. Remove from the oven and let the pan cool for about 5 minutes.

Next comes the upside-down magic, inverting the cake.  Place your cake plate over top of the cake.  Carefully (using pot holders because it’s going to be hot) flip over the cake so that the cake pan is on the bottom and lift off the skillet.

Then the hard part, waiting for dessert time!  Enjoy your delicious pineapple upside down cake!

Share this on Pinterest! http://www.pinterest.com/pin/280278776783959012/

If you like my recipes, be a sweetie pie and share on Facebook,
Like my page “I Love To Cook” and Pin these yummy recipes on Pinterest.  🙂

Sharon Springfield

Sharon Springfield  

Sharon Springfield on PinterestSharon Springfield on FacebookFollow Me On Google+

http://sharonspringfield.com/images/cooking-blog-logo.jpghttp://sharonspringfield.com/wp-content/uploads/2013/07/youtube-150x150.jpg


Powered by Wordpress Plugins - Get the full version!

The Best Pineapple Upside Down Cake