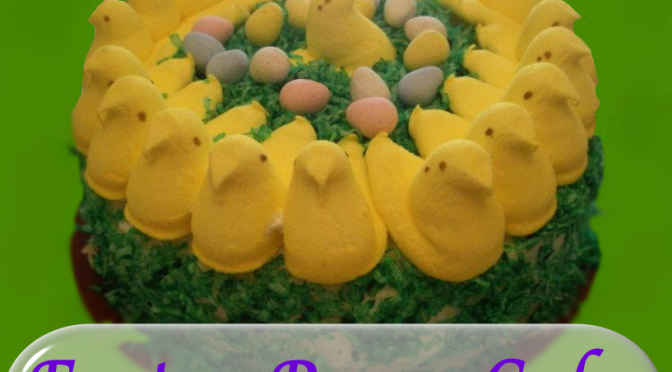
Category Archives: Desserts

Easter Peeps Cake

Easter Peeps Coconut Cake

Easter Peeps Cake

Here’s a cute and easy cake to serve at your Easter party.  All you need is a cake mix and frosting, shredded coconut, peeps and some egg shaped Easter candy.

Start with a coconut or carrot cake mix and prepare according to package directions for 2 layer round cake.

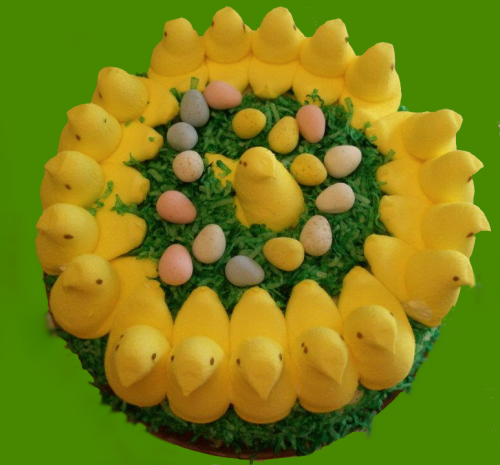
When the cake layers have cooled, frost with white frosting, your favorite flavor.  (I love buttercream or cream cheese)  Arrange the Peeps around the top edge of the cake.  Place one peep in the middle.(see photo) 

Easter Peep Cake

Tint shredded coconut by dropping a few drops of green food coloring in a large ziplock bag.  Dump in half a bag of coconut, seal the bag and then shake it up until the shredded coconut is all tinted green.  The more drops of food coloring, the darker the “Easter grass” will be.

Sprinkle the shredded coconut over the top of the cake and press onto the sides of the cake.  Sprinkle egg shaped Easter candies in the middle of the top of the cake.  

And there you have it!  An easy and adorable Easter Peeps Cake to be the star of your Easter dinner.  🙂

Pin it!  Here’s the link: http://www.pinterest.com/pin/280278776784008581/

If you like my recipes, be a sweetie pie and share on Facebook,
Like my page “I Love To Cook” and Pin these yummy recipes on Pinterest.  🙂

Sharon Springfield

Sharon Springfield  

Sharon Springfield on PinterestSharon Springfield on FacebookFollow Me On Google+

http://sharonspringfield.com/images/cooking-blog-logo.jpghttp://sharonspringfield.com/wp-content/uploads/2013/07/youtube-150x150.jpg


Powered by Wordpress Plugins - Get the full version!

Easter Peeps Cake

Nutter Butter Easter Chicks

Nutter Butter Easter Chicks


When I was on Pinterest, I ran across this and thought they were just precious!  This will be a fun project to do this weekend.  (The website this came from is listed on the photo above.)

Easter Chicks made with Nutter Butter Cookies

Nutter Butter cookies
Yellow Candy Melts or Chocolate (melted)
Black Sugar Pearls
Rainbow Chip Sprinkles
5.5″ Wood Coffee Stirrers
Wax Paper or Parchment

Work over the wax paper …

Insert the wood stick about half way up the cookie and separate the cookie … put a small amount of melted candy … put cookie back together and let candy harden. (This step is very important so that the cookies don’t fall off the stick!)

Dip the cookie in melted candy and tap off excess.  Lay on wax paper.

Place 2 orange Reece’s Pieces as the feet and 2 yellow ones for the wings.  Place 2 black sugar pearls for eyes and 1 orange Rainbow Chip for the beak.

Chill for a few minutes.

Nutter Butter Chicks from Simple Sweet Stuff.com

Happy Easter! 🙂

If you like my recipes, be a sweetie pie and share on Facebook,
Like my page “I Love To Cook” and Pin these yummy recipes on Pinterest.  🙂

Sharon Springfield

Sharon Springfield  

Sharon Springfield on PinterestSharon Springfield on FacebookFollow Me On Google+

http://sharonspringfield.com/images/cooking-blog-logo.jpghttp://sharonspringfield.com/wp-content/uploads/2013/07/youtube-150x150.jpg


Powered by Wordpress Plugins - Get the full version!

Nutter Butter Easter Chicks

Coconut Macaroon Nutella Nests

Coconut Macaroon Nutella Nests

Easter Gifts for Kids

Coconut Macaroon Nutella Nests

Yield: 10 nests Prep Time: 10 minutes Cook Time: 17-20 minutes
Coconut cookie nests filled with Nutella and Easter egg candies. These cookies are perfect for Spring and Easter.

2/3 cup sweetened condensed milk
1 large egg white
1 1/2 teaspoons vanilla
1/8 teaspoon salt
3 1/2 cups sweetened coconut
1 cup Nutella
M&M Speck-tacular Eggs (or other Easter candy)

Preheat the oven to 325°F. Line a large baking sheet with parchment paper or a Silpat mat.

Cuisinart 17

In a large bowl, stir together the sweetened condensed milk, egg white, vanilla extract, and salt. Stir until combined. Add in the coconut and mix well.

With a spoon, scoop up about 2 Tablespoons of the dough and place the dough onto the prepared baking sheet. Form the cookies into the shape of a bird nest. Press down the center with your thumb.

Bake cookies for 17 to 20 minutes, or until slightly golden brown. Remove from the oven and press your thumb down in the center of the nests again. Cool the cookies on the baking sheets for about 5 minutes or until they are firm and set. Remove with a spatula onto a cooling rack. Cool completely.

Place about a tablespoon of Nutella in the center of each nest. Place 3 egg candies in the center of the nest. Finish decorating the nests and serve.

Note-you can make these 2-3 days in advance. Store in an air tight container on the counter.

If you like my recipes, be a sweetie pie and share on Facebook,
Like my page “I Love To Cook” and Pin these yummy recipes on Pinterest.  🙂

Sharon Springfield

Sharon Springfield  

Sharon Springfield on PinterestSharon Springfield on FacebookFollow Me On Google+

http://sharonspringfield.com/images/cooking-blog-logo.jpghttp://sharonspringfield.com/wp-content/uploads/2013/07/youtube-150x150.jpg


Powered by Wordpress Plugins - Get the full version!

Coconut Macaroon Nutella Nests


Banana Split Pie

Banana Split Pie

This delicious Banana Split Pie is not shaped like a pie, but it’s not a cake either.  It’s 9 by 13 inches of creamy, fruity goodness that you may test your self control.  Yes, it’s that good!  This cool dessert is great for a summertime buffet or family party.

Banana Split Pie:

2 cups graham cracker crumbs
1 stick of butter, melted
1 (8 oz.) package cream cheese, softened
1 can sweetened condensed milk
1 large can crushed pineapple
4 bananas, sliced
1 large carton Cool Whip
chopped nuts
Maraschino cherries
cocoa powder (optional)

Mix butter and graham cracker crumbs and press into the bottom of a 9×13″ baking dish.  Thoroughly mix together the softened cream cheese and sweetened condensed milk.  Spread over the graham cracker crust, followed by the pineapple and bananas.  Spread with Cool Whip and top with nuts and cherries.  Dust with cocoa powder (optional).  Cover with plastic wrap and refrigerate until thoroughly chilled before serving.

Like this?  Pin it!  Here’s the link: http://www.pinterest.com/pin/280278776783975614/

If you like my recipes, be a sweetie pie and share on Facebook,
Like my page “I Love To Cook” and Pin these yummy recipes on Pinterest.  🙂

Sharon Springfield

Sharon Springfield  

Sharon Springfield on PinterestSharon Springfield on FacebookFollow Me On Google+

http://sharonspringfield.com/images/cooking-blog-logo.jpghttp://sharonspringfield.com/wp-content/uploads/2013/07/youtube-150x150.jpg


Powered by Wordpress Plugins - Get the full version!

 Banana Split Pie

The Best Pineapple Upside Down Cake

image001


Not to brag, but I make the best pineapple upside down cake. This cake is smothered in buttery, sticky sweet pineapple and cherries.  It’s irresistible and a hit at every potluck or family gathering.  I’m going to teach you how you can make one too.

 The Best Pineapple Upside Down Cake Ingredients:

  • butter
  • brown sugar
  • 2 cans of pineapple slices
  • A jar of maraschino cherries
  • Yellow cake mix

The Best Pineapple Upside Down Cake Instructions:

To be authentic, you need to bake this in a cast iron skillet.  This is how I learned from my Mom, an old fashioned southern cook.  A 12 inch skillet does the trick. You could also use two round cake pans for one cake mix.  Heat pan(s) it in the oven and melt 3 tablespoons of butter in the skillet.  Remove from the oven and sprinkle brown sugar in an even layer over the butter.  Drain the pineapple juice, reserving it to use later in the batter.  Arrange pineapple rings in the bottom of your skillet, over the brown sugar – butter layer.  Place a cherry in the middle of each pineapple ring and in the spaces between the rings.  Set aside.

At this point you could either use a cake mix or whip up some homemade cake batter.  Replace the liquids called for in the recipe with the reserved pineapple juice.  Pour cake batter into pans and bake for 25 to 30 minutes or until toothpick inserted in middle comes out clean. Remove from the oven and let the pan cool for about 5 minutes.

Next comes the upside-down magic, inverting the cake.  Place your cake plate over top of the cake.  Carefully (using pot holders because it’s going to be hot) flip over the cake so that the cake pan is on the bottom and lift off the skillet.

Then the hard part, waiting for dessert time!  Enjoy your delicious pineapple upside down cake!

Share this on Pinterest! http://www.pinterest.com/pin/280278776783959012/

If you like my recipes, be a sweetie pie and share on Facebook,
Like my page “I Love To Cook” and Pin these yummy recipes on Pinterest.  🙂

Sharon Springfield

Sharon Springfield  

Sharon Springfield on PinterestSharon Springfield on FacebookFollow Me On Google+

http://sharonspringfield.com/images/cooking-blog-logo.jpghttp://sharonspringfield.com/wp-content/uploads/2013/07/youtube-150x150.jpg


Powered by Wordpress Plugins - Get the full version!

The Best Pineapple Upside Down Cake