Tag Archives: cake

The Best Pineapple Upside Down Cake

image001


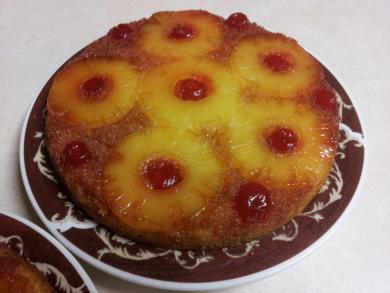
Not to brag, but I make the best pineapple upside down cake. This cake is smothered in buttery, sticky sweet pineapple and cherries.  It’s irresistible and a hit at every potluck or family gathering.  I’m going to teach you how you can make one too.

 The Best Pineapple Upside Down Cake Ingredients:

  • butter
  • brown sugar
  • 2 cans of pineapple slices
  • A jar of maraschino cherries
  • Yellow cake mix

The Best Pineapple Upside Down Cake Instructions:

To be authentic, you need to bake this in a cast iron skillet.  This is how I learned from my Mom, an old fashioned southern cook.  A 12 inch skillet does the trick. You could also use two round cake pans for one cake mix.  Heat pan(s) it in the oven and melt 3 tablespoons of butter in the skillet.  Remove from the oven and sprinkle brown sugar in an even layer over the butter.  Drain the pineapple juice, reserving it to use later in the batter.  Arrange pineapple rings in the bottom of your skillet, over the brown sugar – butter layer.  Place a cherry in the middle of each pineapple ring and in the spaces between the rings.  Set aside.

At this point you could either use a cake mix or whip up some homemade cake batter.  Replace the liquids called for in the recipe with the reserved pineapple juice.  Pour cake batter into pans and bake for 25 to 30 minutes or until toothpick inserted in middle comes out clean. Remove from the oven and let the pan cool for about 5 minutes.

Next comes the upside-down magic, inverting the cake.  Place your cake plate over top of the cake.  Carefully (using pot holders because it’s going to be hot) flip over the cake so that the cake pan is on the bottom and lift off the skillet.

Then the hard part, waiting for dessert time!  Enjoy your delicious pineapple upside down cake!

Share this on Pinterest! http://www.pinterest.com/pin/280278776783959012/

If you like my recipes, be a sweetie pie and share on Facebook,
Like my page “I Love To Cook” and Pin these yummy recipes on Pinterest.  🙂

Sharon Springfield

Sharon Springfield  

Sharon Springfield on PinterestSharon Springfield on FacebookFollow Me On Google+

http://sharonspringfield.com/images/cooking-blog-logo.jpghttp://sharonspringfield.com/wp-content/uploads/2013/07/youtube-150x150.jpg


Powered by Wordpress Plugins - Get the full version!

The Best Pineapple Upside Down Cake

Super Sweetie Valentine Cake

Super Sweetie Valentine Cake


Valentine’s Day Cake

Here’s a super simple idea to decorate any round layer cake in a valentine’s theme.  Just make a double layer round cake and frost it with any cake / frosting combo that suits you.  Then stack Kit-Kat bars around the edges, securing them with a ribbon tied in a bow.  Then top the cake with Valentine M&M’s!  Isn’t it just adorable?  Make this Valentine’s Day extra special with this super nice cake!

Happy Valentine’s Day!

Pin The Recipe!  http://www.pinterest.com/pin/280278776783644761/

Sharon Springfield

Sharon Springfield

 Sharon Springfield on Facebookhttp://sharonspringfield.com/wp-content/uploads/2013/07/youtube-150x150.jpgSharon Springfield on Pinteresthttp://sharonspringfield.com/images/cooking-blog-logo.jpg

Almond Joy Cake

Almond Joy Cake


Almond Joy Cake

To make this super delicious Almond Joy Cake, you will need:

1 dark chocolate cake mix, made with 2 eggs, 1/4 cup coffee, 1 1/4 cup water, 1/2 cup oil

Bake in a greased 9 x 13 glass baking dish according to the directions on box.

When cake is done, remove from oven and cool on a wire rack.  After 10 minutes, use the handle of a wooden spoon to poke holes in cake – at 2 inches apart.

In a mixing bowl, mix together a 5.1 oz box of vanilla pudding, 1/2 teaspoon coconut extract and 1 7 oz jar of marshmallow fluff.  Pour half over the top of the cake, spreading over the holes so the pudding goes down all the holes and covers the entire cake;  Mix into the other half of the pudding, 4 oz softened cream cheese and 8 oz. softened cool whip.  

Spread this over the top of the cake.  Sprinkle with shredded coconut and slivered almonds. Chill for 2 hours before serving.

Enjoy this delicious Almond Joy Cake!  I thought it was awesome, hope you do too!

Sharon Springfield

Sharon SPringfield


Sharon Springfield on Facebookhttp://sharonspringfield.com/wp-content/uploads/2013/07/youtube-150x150.jpgSharon Springfield on Pinteresthttp://sharonspringfield.com/images/cooking-blog-logo.jpg

Sharon Springfield     |       My Cooking & Recipes Blog

Free Cookbooks! Sign up for my e-mail list here:  http://forms.aweber.com/form/62/982539962.htm


Almond Joy Cake

Easy Homemade Cake Pops

Easy Homemade Cake Pops


Here’s my recipe for making easy homemade cake pops.

This is a cute way to use a cake that got stuck to the pans and crumbled.  That’s where these came from.  I had two helpers in the kitchen, trying to help me make a cake (since I have a broken toe) and nobody floured the cake pans.  Therefore, the cake didn’t come out of the pans in one piece.  So, I just scooped it into a zip-lock bag and stuck it into the freezer and sent my hubby to Publix to buy his own birthday cake. 😉

Anyway, as soon as this kitchen disaster occurred, I already knew what I would do with the crumbled cake.  Great way to recycle, huh?

To make cake pops, you need:

A cake mix, baked according to package directions – or a cake make from scratch
1 container frosting
candy melts (chocolate coating wafers – Michael’s crafts sells them)
Lollipop sticks (also from Michael’s Crafts)
sprinkles

Here’s how you put together the cake pops:

Prepare your drying stands.  As you can see from the picture, I used egg cartons with holes poked in the top.  I used my meat thermometer to poke the holes.  They are centered over the depression for the eggs, spaced so the cake pops don’t collide.

Prepare a baking pan to cool the cake balls.  Take waxed paper and cover the bottom of a baking pan – a cookie sheet with sides.  Set aside for now.

Take your cooled cake and crumble it into crumbs in a very large mixing bowl.
Melt the frosting in the microwave for about 30 – 45 seconds and stir it until smooth and melted.  Pour the frosting over the crumbled cake and stir it in until all the crumbs are moistened with the frosting.  I only used 3/4 of the container of frosting.

I wore rubber gloves for this next step.  Scoop up a rounded tablespoon of cake mixture and form into a ball.  Make sure you compress it well, you do not want the cake balls to fall apart when you dip them in the chocolate.  Place the cake balls on the wax paper as you make them.  When you have made all the cake balls, place the pan in the refrigerator for about an hour for them to firm up.

When they’re thoroughly chilled, take out of the refrigerator.

Get a glass bowl or other microwave safe bowl out and place half the candy melts in the bowl.  Microwave at 50% for 1 minute, stir and if needed microwave for another 30 seconds, until it is melted and smooth when stirred.

Take a stick and insert it into a cake ball.  Then dip your cake pop into the melted chocolate, swirling it against the sides and all the way up to the stick.  When it’s completely coated, sprinkle with decorative sprinkles and place them in the stands to dry.  Carefully slide the sticks into the holes of your ghetto-cake pop stand. (I have also used a block of Styrofoam before but didn’t have one at home when I undertook this project today.)

Once they have dried and the candy coating is hardened, you can wrap them up in squares of plastic wrap and tie with curling ribbons.

You can display them in a bouquet fashion using a short vase or jar.

These can be made for any holiday, just switch up the colors of candy coating and the sprinkles.

These cake pops go fast, so hide a couple for yourself to enjoy later!  This batch of cake pops is dwindling quick!

Homemade Cake Pops

Sharon Springfield

Sharon Springfield

 Sharon Springfield on Facebookhttp://sharonspringfield.com/wp-content/uploads/2013/07/youtube-150x150.jpgSharon Springfield on Pinteresthttp://sharonspringfield.com/images/cooking-blog-logo.jpg

Homemade Ice Cream Cake

Homemade Ice Cream Cake


Hey y’all…since it’s summer and really hot, my kids have been begging me to make another Ice Cream Cake.  So I did…

This time we took pictures of the procedure in case you wanted to make one too.  It’s really not that hard to do and it’s really delicious!  You can make it with whatever flavors you like.  My first one was with lactose free Tofutti ice cream.  This one is with regular ice cream and frozen yogurt: chocolate brownie, strawberry and vanilla.

Crushed Oreos


The first step is to prepare your pan.  Line a springform pan with a large sheet of plastic wrap.  I had some extra wide plastic wrap but if you don’t, just use a couple strips of regular sized and overlap them so the entire pan and up the sides is covered with the plastic.

Line the Pan

Next, crush 2 packages of cookies (Oreo’s or similar) in a ziplock bag and a meat mallet.  Do about 1/3 of the package at a time.  Spread a layer of the crumbs over the bottom of the prepared pan.

First Layer Of Ice Cream


Spoon softened ice cream over top of the oreo crust layer, spreading out evenly.  You will use about 1 quart for this layer.

Second Oreo Layer


Sprinkle a layer of crushed cookies on top and cover with plastic wrap and put into freezer for at least 30 minutes.

Second Ice Cream Layer


Remove from freezer and uncover.  Spread another layer of ice cream over the crumb layer. Top with more cookie crumbs and the cover with plastic wrap.  Freeze for at least 30 minutes.  Repeat with final layer of ice cream.  Cover and freeze overnight.

Freeze Overnight

The next day, remove all plastic wrap from the ice cream cake and place on a cake plate.

image015

Spread with thawed cool whip.  Freeze uncovered for an hour then cover with plastic wrap.

image017


When ready to serve, remove from freezer about 15 minutes before serving.  Cut using a big, bad chef’s knife.  Enjoy!

*Try different flavor combos according to your taste.  Some to try…coffee, chocolate, caramel, or different flavors of sherbet with crushed shortbread cookies or coconut cookies in between the layers.

Homemade Ice Cream Cake


Sharon Springfield

Sharon Springfield

 Sharon Springfield on Facebookhttp://sharonspringfield.com/wp-content/uploads/2013/07/youtube-150x150.jpgSharon Springfield on Pinteresthttp://sharonspringfield.com/images/cooking-blog-logo.jpg